Showing posts with label Pattern Hacking. Show all posts

Sunday, 10 November 2013

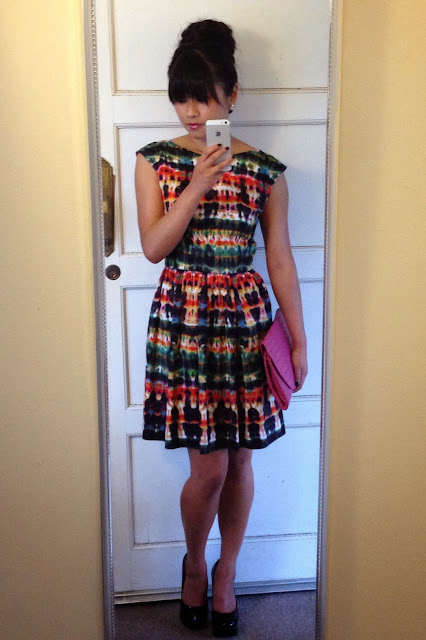
Finished Project: A psychedelic dress.


I don't know if I can/should even tag this post with the label "McCalls 5845" any more since the only original part is the front bodice, and even that has a slight alteration... so I apologise to the people who stumbled on to my blog when googling "M5845". 

You've heard it before, the 5845 is my favourite sewing pattern of all time.
The 5845, a simple darted bodice with a high front neck, low cut back and fitted skirt. 
The version I have made has a low scoop back and full gathered skirt.

I found this cotton sateen in my stash, washed it, dried it, then stared at it for days. Days. Not even exaggerating. I couldn't decide between making another strapless M6349 (with short full skirt) or a M5845 with short full skirt. In the end, I stuck with my TNT pattern - M5845.

The bodice is the same as my floral version with outside darts except I did a swayback adjustment, a proper one. The skirt is from M6349 so it's slimmer than my "self drafted" full gathered skirts. I prefer this skirt, it's less poofy and less hem to handsew.

I lined the bodice with red sunsilky polyester, installed a waist stay, and handpicked the zip.


Here is the low down...

Pattern: McCall's 5845 bodice with alterations, McCalls's 6349 skirt
Size: 4 bust, 10 waist, 6 skirt.
Fabric: 1.5m cotton sateen (Darn Cheap, I think! I don't even remember buying this fabric), 0.5m sunsilky lining
Notions: Gutermann thread, dress zipper 14" (black), 80cm grosgrain ribbon, bikini hook,
Cost: Fabric $20, Lining $5, Zipper $2, Grosgrain Ribbon $2, Bikini hook $1
Hours: about 8hrs
Pattern Modification/Adjustments:
  • Lowered front neck
  • Scoop back
  • 1cm sway back adjustment
  • Replaced fitted skirt with full gathered skirt
Techniques Used:
  • Waist Stay (great tutorial by Sewaholic here)
  • Hand picked zip
  • Gathering (skirt)
  • French seam (skirt side seams)


I did my best to match up the squiggles at the seams. Looks pretty rad!
I added a grosgrain ribbon waist stay to take some pressure off the zip and to cover up the waist seam. Love waist stays, they look so pretty.
The best part of this dress is the hem. I deliberately hemmed the skirt so that the solid black would sit on the edge of the hem.The hem is quite thick - 8.5cm to be exact!! I wanted to leave the hem thick, kinda like a faux-hem-facing. Can't get enough of the psychedelic print.
I french seamed the skirt side seams for a neat finish.


The print is so crazy, my sister nicknamed it 'psychedelic' so I stuck with the name. It is kind of mesmerizing to look at. Maybe that's why I was staring at it for days. Maybe I was in a trance?

Cos it's such a crazy, colorful print I found it super hard to style cos I suck at ANYTHING to do with accessorizing. I will never be on of those girls that can pair up a printed dress with bold accessories and crazy shoes. I tend to stick to plain jewellery (sometimes no jewellery) and plain shoes. Boring, plain Jane. Boo.

I tried the dress on with a pink envelope clutch to bring out the pink in the dress, and plain black patent leather heels and tweeted for help! The #sewcialist ladies gave me the thumbs up on my outfit so I wore it to my builders awards night on Friday.


It was a cool evening so I ended up wearing a black ASOS blazer over the top of the dress. Borrowed the hot pink clutch my my sister. The event was wonderful as usual, great food, awesome drinks and it was great to see builders win awards for houses that they put their heart and soul into building.

Initially I was hesitant to wear this dress out. I even had a back-up outfit planned!
I'm so used to wearing plain colors or florals so this crazy print was a challenge.

I am more critical of myself when I wear a handmade/me-made dress, everything has to be perfect, because I can't really blame "the dress" if I look like a fail... cos I made it myself!

Does anyone else feel this way?


Read More

Thursday, 15 March 2012

Finished Project: "But, Peter, how do we get to Never Land?" "Fly, of course."

'Peter Pan' collar mission complete! 

I am very happy with the result. I wanted to finish the dress by Thursday so I could wear it, but at the same time I promised to take care and take my time. No pressure, no stress. I put the radio on each night and sang along to the nation’s top 30 songs while sewing. I think I am now a One Direction fan.

The perks of living alone and no longer having a gym membership - I finished the dress over three nights. Because I don’t have a live-in BF, pets, kids, or Facebook (haha), I can sew for hours without any interruption. The best. What did I do before sewing????

Day 1: Went to Spotlight to look for a Horn sewing cabinet – came home with fabric instead. Traced pattern, cut fabric, sewed bodice and skirt.
I used the V8469 bodice without the sleeves, and added Peter Pan collars. I followed Gertie’s online tutorial to draft the collar. I put iron-on interfacing on the midriff lining pieces. I stay-stitched every single curvy bit on the bodice. I PFF’d (press flat first). Day 1 blog post here.

Day 2: Cut lining, sewed bodice lining and skirt lining, sewed everything together, bagged the bodice, inserted invisible zip and sewed lining and dress together. Zig zagged my hems. When joining the bodice and lining together, I took great care to make sure the seams matched up. I even unpicked one side because it was a couple of millimetres off. I hate unpicking, but I wanted to finish the dress knowing I put in 100% effort. Now, to the invisible zipper: this time I was awake and alert and I still buggered up the zipper! I only sewed a couple of centimetres and I could see the invisible zipper foot was not doing it’s job. It was malfunctioning!! I used my regular zipper foot instead. It was soooo much better. I had more control over where the needle was going and could see if the zipper was rolled out enough. I’m quite happy with the zipper job.

Day 3: Hemming. I used the twin needle on my machine to finish the hem on the dress.

Sorry, the red is soooo hard to photograph. If I had natural light, it might turn out better.


V8469 bodice with Peter Pan collars and full gathered skirt.
Outside, premium cotton sateen.


V8469 bodice with Peter Pan collars and full gathered skirt.
Inside, sunsilky lining.
I am really addicted to lining. I love how it looks and feels. Sometimes I spend more money on the lining than I do on the dress fabric! I love how it hides all the seam allowances inside and all my ugly backstitching. Maybe when I learn how to operate my overlocker, I won’t be too bothered by seam allowances and can go back to making unlined dresses.

Pattern: V8469 bodice, drafted own collars and own skirt.
Size: Size 6 bodice, graded to size 8 waist.
Skirt info: 
    • Length 50cm (54.5cm with 3cm hem and 1.5cm SA)
    • Skirt width 2.4.m
    • I cut the 2 pieces on the centre fold (60cm wide, from centre to selvege, length 54.5cm). I cut 1 of the pieces in half to make the back of the skirt (needs a back seam)
Fabric: 1.8m premium cotton sateen (red), 1.8m sunsilky lining (red), 0.7m whisperweft interfacing.
Notions: Invisible zipper (hot red) 24", Gutermann thread (156).
Modifications: 
    • added Peter Pan collars,
    • replaced skirt with full gathered skirt.
Time: About 13 hours, over 3 days.
Total cost: $25 - thanks 30% off sale - (fabric, lining, zip), pattern, whisperweft interfacing, thread from my stash.

TIPS for next time: 
  • Maybe make the skirt less wide. 2m wide might be enough,
  • Use regular zipper foot for the invisible zip - the invisible zipper foot is... broken.
New techniques learned: 

"... pop ya collar, don't let 'em sweat ya ..." - Usher
V8469 bodice with Peter Pan collars, upclose.
Collars, bust gathering, zipper, twin needle on the hemline.
Weekly dressmaking class: In this week’s class, I started tracing my Simplicity 3222 vintage pattern, cut up calico to make a toile/muslin. I’ll sew the toile up during the week. I hope it fits! It’s a size 10, so will fit my waist, just hoping I have enough up top to fill out the bodice! I am very exciting to be sewing with an actual vintage pattern, the paper is so crispy J


Tonight, I'm off to pick up my Horn sewing cabinet. Very excited about that!! My overlocker and sewing machine will now have home-sweet-home..


Read More
Powered by Blogger.

© 2011-2014 Sew Me Love, AllRightsReserved.

Designed by ScreenWritersArena