Showing posts with label Tutorials. Show all posts

Thursday, 20 February 2014

FITTING: Reducing neckline gaping - hollow/shallow chest adjustment.

Diagnosing a hollow/shallow chest: On my bodice I noticed there was excess fabric on my front bodice between my 'apex' (nipple?!??!!) and the neckline. It looked like the top half of my bodice was "collapsing" on to my chest, because my chest was too shallow to hold up the bodice. Make sense? 

This year I have become obsessed with achieving the perfect fit. I've spent way too many hours and dollars on making up dresses that don't fit well. 

I'm no expert when it comes to pattern adjustments or fitting but these are techniques that have worked for me. 

I basically make up the bodice muslin/toile, try it on, pinch and pin out the excess fabric.


The example above is my 'Anna' dress. I didn't do an SBA for my Anna (I did every other adjustment under the sun for it though, haha). The bodice fit well, but the neck line was wrinkly and gaping. 

This is how it looked before I pinched out a 4cm wedge on each side of the bodice. 


I transferred the 4cm wedge on to the pattern piece, like below (drawings not to scale). Once the 'wedge' is taken out, the neck line will need to be smoothed out. 


The next example is my 'Georgia' dress. The small bust adjustment (SBA) solved the fitting issue in the 'cup' area of my bust, but the top half of my bust (nipple and above) didn't fit well into my bodice. 


The (centre front) neck line was not sitting against my chest. I pinched out a 3cm wedge on each side of the (front centre) bodice. I transferred the 3cm wedge on to the pattern piece, like below (drawings are not to scale). Once the 'wedge' is taken out, the neck line will need to be smoothed out. 

NOTE: Ignore the "SA 15"" on the drawing - I meant 15mm - not inches for the seam allowance!! 


Call it neck darts, call it wedges, call it a shallow/hollow/caramello chest adjustment, whatever!! 

At the end of the day, if there is excess fabric on the bodice, pinch it, pin it, then take that wedge out of the pattern piece. 

I used to be caught up in 'defining' every adjustment that needed to be made, thinking that if it didn't have a 'name' or appear on Google search then the adjustment wasn't legit or correct, but ultimately, if there's excess fabric and if it's bugging you, get rid of it. 

On both the Anna and Georgia, I have made a dart all the way to the seam allowance (SA) but every body will be different, so just transfer the adjustments to your pattern piece as per amount of fabric pinched out from your muslin/toile.

I hope this helps you if you are experiencing bodice fitting issues. 
My advice is always make a muslin/toile and keep persisting, the end result will be worth it :)


Read More

Friday, 24 January 2014

FITTING: By Hand London 'Anna' muslin/toile with sway back adjustment, neck darts & repositioned side seam (part 4).

By now I am sure you are sick to death of my posts and tweets on this topic. I am a woman possessed!! Just make the fucking thing already, right?

Well, now I can!!! I finally got the fit right on my muslin.

After making what felt like two hundred adjustments, the Anna dress is ready to be made up in my beautiful floral cotton voile.

After I did the erect back/short back and shoulder seam adjustments the waistline was still dipping and there was some gaping at the front neck.

I ended up doing a 2.5cm sway back adjustment and took 4cm wedges out of the neck.


As you can see, the neck fit better, the waist was level, but the side seams were still swinging forward. 

I was going to ignore the swinging side seam, but I realised that it would probably affect the way the front of skirt sits on my body, forcing the skirt side seam to swing forward, creating some weird bump... so off to Google I went and I found this:

image
SOURCE

I think instructions "add/subtract twice (abc)" mean you add/subtract on both left and right (ie twice) because they were repositioning the side seams on a sloper whereas I repositioned the side seams on my pattern piece so I didn't add/subtract (abc) amount twice.

I also repositioned the skirt side seams so the bodice and skirt side seams will match up.

The erect back adjustment of 3cm lowered my back neckline, so I added 2cm back into the CB and neckline. Maybe the erect back adjustment wasn't needed?

 So now, I present to you the muslin that has consumed the last fortnight of my life...

Side seam: before and after. I've have since added 2cm to the front bodice length.
Bodice caving in at the top

No more gaping.


There are also some wrinkles on the back and under the arms, but I can't be fucked making another muslin take on another issue right now so I'll turn a blind eye. The wrinkles don't bother me that much.

I have already cut out my floral cotton voile and plan on sewing it this Saturday to wear to a 30th birthday party and a housewarming (both on Sunday). If the wrinkles on this floral version bother me, then I will make more adjustments so that the rayon version I plan to make for my friend's wedding will be perfect. 

Even though it was a frustrating and long winded process, I have to say I enjoyed the challenge. I have learnt a lot of things about my body. Hopefully the next pattern I make (probably Georgia, for the sewalong) won't be as difficult, as I now now what my body issues are and how to fix them.

Speaking of the Georgia Sewalong, I believe that is happening this weekend! Yayyyyy! Who's in???

So now that my fitting dramas with Anna are over, what will I tweet about now? Hahahhaha. 
Thank you every one for your advice, for emailing and linking me to tutorials, for diagnosing my 'issues', for encouraging me and for putting up with the hundreds of #annadress #fittingwoes tweets (especially those followers that DGAF about sewing... who would never read this blog to see this, anyway).

I leave you with a pretty picture of my floral cotton voile, a 22" American Beauty invisible zipper and thread #733.

Happy Australia Day long weekend :)


Read More

Thursday, 8 November 2012

Goodbye invisible zippers & hello handpicking!

For the first time in a long time, my internet was capped for a few days! Soooo 2001...
I was devastated, I couldn't watch new Homeland, Revenge or Gossip Girl; download Justin Bieber's song (don't laugh but I really like the song 'Beauty and a Beat' after hearing it on X Factor Au) or reply to your comments on my last post about zippers, accidentally cutting my hair and not oiling my machine.

My sewing teacher oiled my machine for me last week, and when reading my manual to see where to oil, it said "make sure to oil the machine once a week if you use it more than an hour a day"... hrm. Thoughts?

Re my paranoia about cutting of my hair and measuring tape, I'm glad you guys can relate to my fear of chopping things off accidentally. I always make sure I am at my most alert when I am cutting my seam allowances and clipping my curves. And when using my rotary cutter :) 

A lot of you guys commented and said that invisible zippers are not as strong as dress zippers but most tend to use invisible zippers. I'm the same, I like invisible zippers because they are "easier" (read: no hand sewing) to install, give a cleaner finish and hand sewing can be a ball breaker sometimes. But there's no denying they are not as strong as the old dress zipper.

I still remember last year when I wore my handmade 'cobalt' skirt to a NYE party and halfway through the festivities, my invisible zipper broke! Luckily it was still holding together at the waistband so my skirt didn't fall down. In public. OMG :(

A week later when I wore my 'burnt orange' dress out on the weekend, I packed spare clothes in my handbag incase I had a wardrobe malfunction. Mind you, the zipper on the dress was an exposed metal zipper, but I was so traumatised by what had happened on NYE, it made me question how durable my handmade garments were. It took months for me to trust my sewing again. 

Then the zipper tab broke off my 'Squiggle' dress. FFS.

I then realised it wasn't my sewing, it was those stupid Birch invisible zippers! I even had one break on me during installation. 

People have told me to use YKK zippers as they are most durable and used on most RTW clothing. So far I have had no luck finding these YKK zippers :(

Sewaholic and Cation Designs were the first blogs I followed religiously when I started reading sewing blogs. 

I am obsessed with Tasia's Simplicity 3965 dresses and love the handpicked zip on her picnic dress. 

When stalking Cindy's blog archive and drooling over her M5845 and NL6723 dresses, I always stop to admire the handpicked zip on the Hippo dress.

Now for some handpicked zipper p o r n...

Tasia's 'Picnic' dress.
(source)
Cindy's 'Hooray for Hippos' dress.
(source)
Gertie's 'Lemon Tree' dress.
(source)

So beautiful <3

I tried my first handpicked zipper when making my Mad Men dress using Tasia's very awesome tutorial.
It turned out OK for my first try. I tried it a few more times on my M6331 strapless dresses (here & here) and on one of my skirts and my 'meh' lace dress the other week.

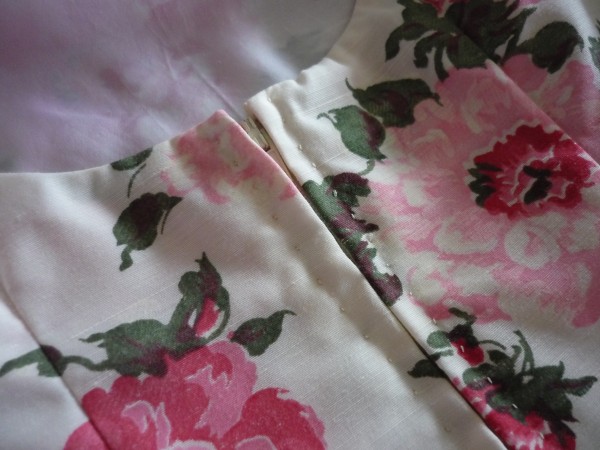
Most recently, I handpicked a zipper on this beautiful floral dress...


Practice makes perfect, I've finally got it right. My stitches are more even and straight. Woo hoo prickstitch!

I'm so confident with my skills that I've offered to repair the zipper on my cousin's handmade dress from Paris! Only concern is my 'stitches' aren't as visible (therefore aren't as strong?) as Tasia, Cindy and Gertie's... something I'll work on next time.

I am so in love with the little 'dots' of thread peeking through the fabric. Ahh smitten.

It is much easier to control the zipper when handpicking, and easier to unpick too. I had to re-do the zipper on this dress and take it in an inch on each side - unpicking the prickstitch (on the zipper tape side) was sooo much easier than unpicking tiny stitches next to the teeth of an invisible zipper.

From now on I will handpick (most of) my zippers because it makes the dress extra special to me, hand sewing can be therapeutic, and dress zippers seem to be stronger than invisible ones.

Oh, and dress zippers are much cheaper too, and since I'll only be buying one zipper from now on, I'll be saving so much $$. More money to spend on fabric!

So ladies, have you handpicked a zipper?


Read More

Saturday, 4 February 2012

Squiggle, squiggle, squiggle, squiggle, squiggle yeah! And a quick zipper tutorial!

I sing that in the tune of LMFAO's song Sexy and I Know It when I look at this fabric... cos the fabric is 'magenta squiggle'. Naming this dress the "3am Squiggle" dress.

A skill that I learnt recently and have used on this dress is inserting an invisible zipper between the dress fabric and the lining, like how the zippers look on RTW. I have been taught that lining can be hand sewed to the dress fabric... but I do it by machine! Clean machine finish :D


My attempt at a tutorial... 


How to insert zipper in a fully lined dress!

Time to insert the invisible zipper
between the fabric and the lining.
Pin the zipper at seam allowance.
2.5cm seam allowance at the back for me.
I have a small back.
Separate the lining and the dress.
Baste zipper on the dress fabric only
(like you would on unlined dress).
Sew zipper with invisible zipper foot.
Repeat on the reverse side.
Flip the lining over so the right sides
of fabric/lining are facing eachother, pin.
Tuck the top bit of the zipper inside so you can sew it in.
Sew lining and dress fabric together close to the zip.
This is how it looks inside out.
Reverse it and voila!
Zipper is between the lining and the fabric.


Now... the finished dress and pattern review!


Do the squiggle, yeah.


I used the fabric I got from Spotlight yesterday and sunsilky lining** that I got for 1/2 price today from Lincraft.

Took 2 hours to cut, 5 hours to sew up the dress, lining, zipper and hem.

**Sunsilky lining: 100% Polyester. Permanently anti-static, treated to breath like a natural fibre.


"Techniques" (which might be normal practice for most seamstresses) that I used on this dress, which I must remember to use all the time cos I love the result so much:


  • PFF (press flat first)
  • Stay stitch - I always forget to do this!! I will make a mental note to remember
  • Zipper inserted between the lining and dress fabric
  • Twin needle hem

I'm proud to say that I did not unpick any of my seams! I made zero mistakes with this dress. This is a first! Usually when I sew late at night, I end up having to unpick at some stage, but not tonight. I started sewing at 9pm tonight and finished at 2am. I'm very nocturnal.

I'm also very happy that my front darts, side seams, and zipper all matched perfectly! The back darts were a little off, but that's ok .


Perfectly lined up darts.
M5845 front bodice.
Darts unaligned but the waist matches at the zipper.
M5845 back bodice.


The only modification I made to the pattern was lower the neck by 2" (5cm) and raise the back by 2" (5cm).

Oooh, and I added in-seam pockets!


Drafted my own in-seam pocket pattern.

Pattern Review... 


Pattern: McCall's 5845
Size: Size 6 bodice, graded to size 8 waist, size 6 skirt.
Fabric: 1.2m cotton sateen, 1m sunsilky lining
Notions: Invisible zipper (black) 16", Gutermann thread (000) 
Modifications: 
    • Lowered neck by 2"
    • Raised back by 2"
    • Skirt pieces shortened to 18.5" (3cm hem)
    • Added pockets
    • Regular (1.5cm) back seam allowance
    • Invisible zipper instead of dress zipper
    • No vent
    • Darts on the inside not outside (damn! I said I would put them outside next time I make this dress, oops).
Time: about 7 hours
Total cost: $14 (fabric, lining and zip), pattern and thread from my stash.


Here are some photos of the inside of the dress.


McCall's 5845
Finished the hems on the machine using the twin needles.
McCall's 5845

I wasn't very keen on the fabric when I saw it, but it was $5/m, so what the heck, I bought it, but I really like it now. At first glance, I thought it looked like a leopard print, but at closer inspection, it looks like blobs of spilt paint, lol. I really like it. Even if it does look like skanky leopard print, the high neck balances it out, haha.

I know I say this about every single dress after I finish making it, but I really love this one. I sewed with a lot of patience and applied techniques that I have learnt at sewing class and by reading online blogs. I guess it shows that I am improving if every new dress tops the last one.

I really like this dress cos it is fitted. It is very rare for me to fit "fitted" RTW dresses... if they fit at the bust and hips then it doesn't zip up at the waist. If it fits the waist, then its loose and yucky at the hips and bust. So glad I can customised my dress to fit my body.


McCall's 5845 (back)
McCall's 5845 with pockets.

Alrighty, off to bed for me :)


Read More

Saturday, 17 December 2011

Tutorial: Half, Full & Quarter Circle Skirt

I have always wanted to make circle skirts for my dresses... and I finally found a tutorial.
It looks easy! I'll be giving it a go very soon!!

Andrea Tung's Tutorials
Tutorial for FULL SKIRT
Tutorial for HALF CIRCLE SKIRT
**** UPDATE 29.10.2012: The above tutorials by Andrea Tung are no longer online :(

Hand By London Tutorial - found this tutorial on 19.10.2012.
Tutorial for FULL, HALF & QUARTER SKIRT

Updates: Below are photos of half and full circle skirts I have made following the instructions on Andrea Tung's tutorials. Click on the links to read the post & see more photos.

Butterick 5455 bodice with half circle skirt.

New Look 6723 bodice with full circle skirt.

Vogue 8511 bodice front with full circle skirt.

McCall's 5845 with full circle skirt.


Read More
Powered by Blogger.

© 2011-2014 Sew Me Love, AllRightsReserved.

Designed by ScreenWritersArena