Showing posts with label McCall's. Show all posts

Sunday, 10 November 2013

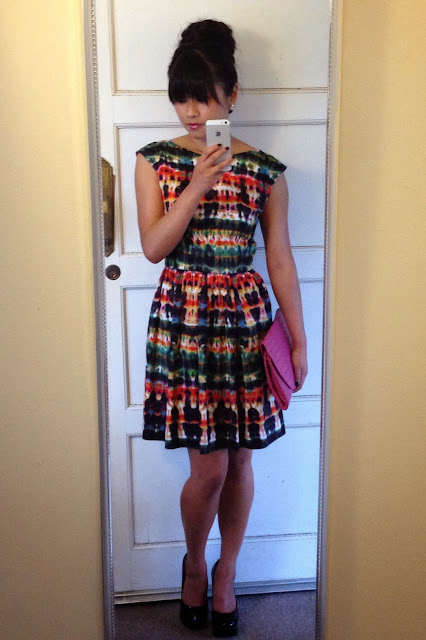
Finished Project: A psychedelic dress.


I don't know if I can/should even tag this post with the label "McCalls 5845" any more since the only original part is the front bodice, and even that has a slight alteration... so I apologise to the people who stumbled on to my blog when googling "M5845". 

You've heard it before, the 5845 is my favourite sewing pattern of all time.
The 5845, a simple darted bodice with a high front neck, low cut back and fitted skirt. 
The version I have made has a low scoop back and full gathered skirt.

I found this cotton sateen in my stash, washed it, dried it, then stared at it for days. Days. Not even exaggerating. I couldn't decide between making another strapless M6349 (with short full skirt) or a M5845 with short full skirt. In the end, I stuck with my TNT pattern - M5845.

The bodice is the same as my floral version with outside darts except I did a swayback adjustment, a proper one. The skirt is from M6349 so it's slimmer than my "self drafted" full gathered skirts. I prefer this skirt, it's less poofy and less hem to handsew.

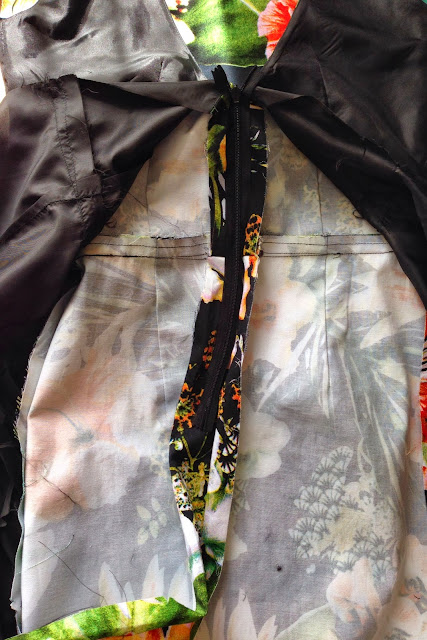
I lined the bodice with red sunsilky polyester, installed a waist stay, and handpicked the zip.


Here is the low down...

Pattern: McCall's 5845 bodice with alterations, McCalls's 6349 skirt
Size: 4 bust, 10 waist, 6 skirt.
Fabric: 1.5m cotton sateen (Darn Cheap, I think! I don't even remember buying this fabric), 0.5m sunsilky lining
Notions: Gutermann thread, dress zipper 14" (black), 80cm grosgrain ribbon, bikini hook,
Cost: Fabric $20, Lining $5, Zipper $2, Grosgrain Ribbon $2, Bikini hook $1
Hours: about 8hrs
Pattern Modification/Adjustments:
  • Lowered front neck
  • Scoop back
  • 1cm sway back adjustment
  • Replaced fitted skirt with full gathered skirt
Techniques Used:
  • Waist Stay (great tutorial by Sewaholic here)
  • Hand picked zip
  • Gathering (skirt)
  • French seam (skirt side seams)


I did my best to match up the squiggles at the seams. Looks pretty rad!
I added a grosgrain ribbon waist stay to take some pressure off the zip and to cover up the waist seam. Love waist stays, they look so pretty.
The best part of this dress is the hem. I deliberately hemmed the skirt so that the solid black would sit on the edge of the hem.The hem is quite thick - 8.5cm to be exact!! I wanted to leave the hem thick, kinda like a faux-hem-facing. Can't get enough of the psychedelic print.
I french seamed the skirt side seams for a neat finish.


The print is so crazy, my sister nicknamed it 'psychedelic' so I stuck with the name. It is kind of mesmerizing to look at. Maybe that's why I was staring at it for days. Maybe I was in a trance?

Cos it's such a crazy, colorful print I found it super hard to style cos I suck at ANYTHING to do with accessorizing. I will never be on of those girls that can pair up a printed dress with bold accessories and crazy shoes. I tend to stick to plain jewellery (sometimes no jewellery) and plain shoes. Boring, plain Jane. Boo.

I tried the dress on with a pink envelope clutch to bring out the pink in the dress, and plain black patent leather heels and tweeted for help! The #sewcialist ladies gave me the thumbs up on my outfit so I wore it to my builders awards night on Friday.


It was a cool evening so I ended up wearing a black ASOS blazer over the top of the dress. Borrowed the hot pink clutch my my sister. The event was wonderful as usual, great food, awesome drinks and it was great to see builders win awards for houses that they put their heart and soul into building.

Initially I was hesitant to wear this dress out. I even had a back-up outfit planned!
I'm so used to wearing plain colors or florals so this crazy print was a challenge.

I am more critical of myself when I wear a handmade/me-made dress, everything has to be perfect, because I can't really blame "the dress" if I look like a fail... cos I made it myself!

Does anyone else feel this way?


Read More

Sunday, 3 November 2013

Finished Project & Pattern Review: McCall's 6349 View C with Maxi Skirt.

M6349 with maxi skirt.

I did it. I made my deadline to have the dress ready to wear on Thanksgiving, with a whole week to spare. I missed out on sewing for Halloween, but no big deal, didn't RSVP yes to any Halloween events on Facebook anyway!! Last year I had a ball on Halloween weekend. My bestie dressed up as a naughty school girl and I dressed up as Dorothy from The Wizard of Oz. I made the dress AND the shoes! Well, I applied red glitter to the shoes.
We went to a house party then ended up at a club event where I hung out with a guy who looked like Pitbull. Woke up with a massive hangover, had lunch with bestie who ordered the "blue-eye, medium-rare" cos she thought it was a steak!! It's fish, btw :)

That was last year. This year on Halloween night I ate a massive dinner (it was a 3-4 person serve and I ate half), then sat on my ass for an hour handpicking the zip on my M6349. Hopefully the handpicking burnt some calories :P

Lets start from the beginning...

I started on the muslin for this dress two weekends ago. The plan was to make a wearable muslin. I had dreams of pairing the muslin bodice with a beautiful lime chiffon maxi skirt. The dream is still alive, just on the back burner for the moment. Need to find a lime chiffon that does not make me look like a walking hi-lighter. Was also thinking burnt orange to bring out the orange flowers.

Would love your thoughts! Also, if I make the skirt out of chiffon, what should I line it with?

The wearable-muslin.
This is the same fabric I used for my Burda 7371 pants.

I chose View C of the dress because I like the sweetheart neckline, but the "front bodice" piece (piece #13) had me stumped. I could not get the gathering right, I could not get the bodice piece to match up with the underlining piece. I gave up. Then I realised that the underlining/lining piece also had a sweetheart neckline, duh, but without all the gathering business, instead it had princess seams. Even better.

I dug through my fabric stash and found this beautiful floral printed cotton voile I purchased from Darn Cheap (Heidelberg) ages ago. It feels amazing on my skin - soft, slinky and cool. I had over 2m of this baby so there was enough to make a 1m long maxi skirt and a self lined bodice.

The bodice pieces are stabilised using whisperweft interfacing (82% Rayon/18% Poly).

Iron-on whisperweft interfacing.

To add more structure and shape, I made padding and handmade bra cups for the bodice. 
I used Sewaholic's tutorial (here and here) which is where I learnt about abutted seams.

I attached the padding to the shell, like an underlining.

My WIP/bodice construction post with more photos and info is here.


Bust padding to give it some oomph!
Abutted seam..
.. or is it butted seam? Who knows!

The bodice is boned using plastic polyboning. 
Polyboning is easy to use, no pliers required!!

Simply cut off the length you need, remove the plastic boning, sew the casing on to the bodice lining, trim 3-4cm off the plastic boning before inserting it back in the casing. 
You trim 3-4cm off to allow for stitching later on when you sew on the lining and attach the skirt - you don't want to break your needles sewing over the plastic!

On my bodice, I used 4 pieces of boning - 2 for side seams, 2 for the back (where the 'side back' and 'back' pieces join).

Polyboning, plastic boning.

I took a risk and didn't line the skirt. I'll just make sure to wear appropriate underwear with this dress, no grandma panties or g-bangers (aka g-string, thong). Because I didn't line the skirt, I french seamed the side skirt seams for a clean and non-fraying finish.

Apologies to Cozy Cotton, I forgot to take photos when I joined the bodice to the skirt!! 

I sewed 3 rows of gathering stitches (long stitches) using red thread so its easier to see and remove later on. Gathered the skirt waist, matched the notches on the skirt and bodice then sewed it all together.

To help the dress stay up, I added a grosgrain ribbon waist stay. This keeps the dress in place and stops the waist from stretching over time. Also takes pressure off the zip and comes in handy when you're home alone with no one to help you zip up.

The zip is hand picked. This 14" zip took just over 1 hour to handpick. 
I love handpicking zips for numerous reasons:
  • dress zippers are cheaper in comparison to invisible ($1.49 vs $3.49)
  • dress zippers are stronger - I've had too many invisible zip break my heart
  • easier to match up the seam because you have more control
  • the little pricks on the back look pretty
Hem - I overlocked/serged the hem then turned it up and machine stitched.

Grosgrain ribbon waist stay.
Handpicked zip, machine stitched hem.
Floralicious!

Pattern Review: McCall's 6349, View C, with no shoulder straps, lengthened skirt to maxi 

Size: 6

Pattern Pieces used: 7 (bodice front lining), 8 (bodice side front lining ), 16 (bodice back), 17 (bodice side back), 19 (skirt back), 21 (skirt front)

Fabric2.3m cotton voile (Darn Cheap) - enough for self-lined bodice, skirt is 1 meter in length.

Notions: Gutermann thread (000), dress zipper 14" (black), 1.6m polyboning, 0.5m whisperweft interfacing, 0.5m cotton/bamboo padding, 80cm grosgrain ribbon, bikini hook,

Cost: Fabric $20, Cotton/Bamboo Padding $5, Zipper $2, Whisperweft Interfacing $5, Polyboning $5, Grosgrain Ribbon $2, Bikini hook $1

Pattern Modification/Adjustments:
  • No shoulder straps
  • Lengthened skirt to 1 meter (floor length maxi)
  • Took the centre back seam at the top by 4cm on each side! Big no-no, but it was too late for a proper adjustment
Techniques Used:
  • Padded Bust
  • Abutted seams
  • Self made bra cups
  • Self lined bodice
  • Boning (great tutorial by Sewaholic here)
  • Waist Stay (great tutorial by Sewaholic here)
  • Hand picked zip
  • Gathering (skirt)
  • French seam (skirt side seams)
Things I will do differently next time:
  • I'll figure out if I need a SBA or if I just need to adjust the back bodice
  • I'll turn the waist seam upwards like I usually do, but on this dress the seam was too thick and boning got in the way so it keep flipping back down
  • Trim the boning more - maybe 5cms, so I can turn the waist seam upwards

Pretty princess seams, Waist stay and Handpicked zip from the inside.
All zipped up. Zip is practically invisible!

I love maxi dresses but it's hard for me to find ones that are the perfect length.
I know, I know, I can take up the hem myself, but I HATE doing alterations. Hate it! Love sewing from scratch, hate alterations. 

I only own three RTW maxi dresses - a green one (too bright to wear frequently), a floral print wrap one (my fav but it's very booby), a simple black one (with a modest bodice) - so I'm desperate for for maxis! 
I used to love above-the-knee dresses, but now I feel so naked in them. They feel so short. I must be coming of age!

I love the Anna dress, so that pattern's going on my wishlist for Christmas. Thigh high slit, yes please!

Next up on my sewing table is a dress I need ready by this Friday 8th November! I have Monday and Tuesday off work (Melbourne Cup long weekend) so I should be able to pull it off!

UPDATE: This morning I was told that the Thanksgiving feast isn't till the 23rd Nov! Don't know why I thought it was this coming Saturday, LOL!! (11.3.13)


Read More

Tuesday, 15 October 2013

Finished Project & Pattern Review: Outside Darts, McCall's 5845.

    So pleased with where the flowers ended up on the bodice.

Um, so I did not know that I have this awesome blank wall in my sewing room! 
So great for photographing my dresses. 

The sewing room has been great to work in, flooded with natural sunlight during the afternoon and warm enough for me to walk around with half my clothes off when I'm stabbing my body with pins at fitting stage. It is fricken hard when you live alone. 

Any tips for a sewist with no house mates? How do you guys get pinned up?
I gotta look at training the boyfriend up on seam allowances and pinning.

As you know, I had some time off work last week so I had plenty of time and no excuse not to sew something. My deadline was Friday 11th as I needed something to wear to my friends' wedding the next afternoon. 

I wanted to challenge myself so I moved away from my usual full skirts and so the measuring of butts began!

Scribbled my body measurements on the back of a takeaway pizza receipt.

I believe what I've written on the above paper are my body measurements in cm and inches, the sizes I chose and the finished measurements on the pattern piece for the size.

The pattern is my favorite pattern of all time - the McCall's 5845. I've made this dress heaps of times, mostly with full skirts, always with back modifications, but NEVER with the darts on the outside as per pattern instructions!

When you search '5845' in PatternReview.com the results page is flooded with reviews from me and Cindy of Cation Designs. We both love this pattern to bits and have modified the heck out of it. Pattern hacking, yay.

Main reason I was never a fan of darts-on-the-outside was because my stitching is sometimes wonky, and my backstitching looks horrible (I blame my machine). 

Well, here are my darts-on-the-outside, what do you think?

Outside darts ftw!

No bad huh?? I love the look of them, they give the dress texture and enough character that a belt is not needed. 

The modification that I always do to the M5845 is the front and back neck. I lower the front neck line about 5cms, and the back neck I usually raise a few inches - just enough so my bra strap is not exposed. 

This time I left the back low and made it into a scoop instead. Bra, schma!

The only modification I made to the pattern - scooped back.

I cut a size 4 bodice, graded it to a 10 waist.

I usually cut an 8 waist, which just "fits" but occassionally rides up, which probably means it's not a great fit! 

I swallowed my pride and cut a 10 on this version to make room for the champagne and wedding cake.

The skirt piece started as a 10 at the waist, graded to an 8 around the butt. 

I ended up taking the side seams of the skirt in around the hips, so I probably could have graded to 8 at the hips. I don't know. I'm still new to this wiggle skirt business. 

I winged most of the adjustments to the skirt. I did something which I think was a 2cm sway back adjustment, you can probably see the stitching in the photo below. Dunno if it was the right adjustment to make, but it certainly took away some bagginess around my lower back. 

My swayback faux-justment messed up my skirts back centre seam. Things went slightly off-grain when I inserted the zip. This resulted with a slight crinkle at the back of the skirt. It pissed me off at first but then it started to look like "butt-gathering" and didn't look too bad so I got over it.

I will never enjoy working with sunsilky, that shit frays like cray but once it's on the dress everything is beautiful again. I love fully lined dresses!

I hate looking at the inside fraying edges and stitching everywhere!
Thank goodness for lining.
I love the floral print so much!
Invisible zipper.
Machine-finished-zipper-sandwiched-between-shell-and-lining (tutorial here).
Fully lined with black sunsilky lining.
Hand stitched the hem (4cm hem) and machine stitched the hem on the lining.

Hand stitched hem looks way better than the disastrous machine hem on my Butterick 6582.
I turned the hem up 4cm on the shell and 8cm on the lining (4cm then up 4cm again to seal in the fraying edges).
Very proud of my straight machine stitching :)
Look at the lining!

Pattern Review: McCalls 5845 (view B, no belt), outside darts.

Size: 4 bust, 10 waist, 8 butt 
Fabric1.5m cotton sateen (Darn Cheap), 0.7m sunsilky lining (Spotlight). I had purchased 1.5m of fabric however the wiggle skirt does not need much fabric. I reckon I only used about 1m of fabric. Plenty leftover for a self-fabric belt!
Notions: Gutermann thread (000), Invisible zipper 10" (black) - I should have used a longer zipper but I had this in my stash.
Time: 3-4 hrs each day, over 5 days
Cost: Fabric $20, Lining from stash (but generally it's $10/m), Zipper from stash
Pattern Modification/Adjustments:
  • Scooped back
  • Lowered front neckline by 5cm
  • Sway back adjustment
  • Size 4 bust graded to 10 waist graded 10 hips, graded to 8 at the butt however ended up taking in the skirt at the hips anyway, so probably could have gotten away with 8 at the hips too, despite my hip measurements being for a 10. Massive sigh.
Techniques Used:
  • Darts (on the outside this time as per pattern)
  • Machine-finished-zipper-sandwiched-between-shell-and-lining. No idea what the technique is called (clearly) but my attempt at tutorial here.
The skirt fits like a dream!!
These was a little wrinkle but I know it's cos I rushed the zip and it's a little off grain.
The scooped back and shoulders fit well, no gaping, yay!
It took me 4 attempts to get the zipper in straight and with waist seam matching perfectly.

What I like about the pattern is how simple it is to prep and sew. An experienced sewist could easily finish this in a day. 
There's 4 pieces to cut out - front bodice, back bodice, front skirt, back skirt. 
There's a total of 8 darts on the bodice and 6 on the skirt. Of course if you fully line the dress, it's x's 2 all the above.

The only difficulty I experienced while making this dress (apart from fitting) was the zipper. 
Oh my god, I almost threw in the towel. The whole zipper session I kept hearing this lyric in my head, not sure from which song, "hoping for the best, but expecting the worst" cos every time I finished sewing down the zipper, I'd zip it up hoping all is good.. and then the fkn seams wouldn't match. 
Finally after 4 attempts, everything matched up, no teeth were ruined (zipper teeth) and the dress fit. 

Saturday, wedding day! It was a gorgeous day, a little windy but super sunny. 
I woke up early to get my hair done. Got home, ate lunch, put on some Arbonne taffeta blush, dress on, quick pics for the blog then headed out to the beachy suburb of Brighton for the ceremony. 

The ceremony was lovely. The reception was even lovelier! It was at a restaurant over looking the bay. There was even a sunken submarine! Bride and groom had wedding pics on the jetty while the guests got into the champagne.

Food was yum! Ate the thickest rib eye ever!! 
Speeches from the Dads, Best Man, MoH, Groom - hilarious!! I was crying from laughter!

I only took a few pics as my iPhone would not do the bride and groom justice... I love the photo I got of the couple cutting the cake, look at how happy the groom is while looking at his wife! Adorable!! 


I'm so glad the bride encouraged me to make a dress to wear to her wedding, cos now that I've seen how great this dress turned out, I can't wait to make more. I hope you guys liked my outside darts and wiggle skirt as much as I did.

I don't think I've seen a version of this pattern with outside darts on the internet yet. If you have, please link me to it in the comments below! 

I have a work function this Friday but I don't have time to make anything. Sadface. 
See the dresses I made for last year's awards nights here and here.

I still have plenty of occasions this year to sew for: Halloween,, another work awards night, work Xmas party... so help me out with ideas guys! 


Read More

Thursday, 18 October 2012

Finished Project & Pattern Review: McCall's 5850.

I actually finished this dress a couple of months ago, but didn't get around to taking photos or blogging about it because I was hoping to add a few more finishing touches to improve the fit on me but I have since given up and moved on to Burda 7254 which is actually coming along quite nicely. 

After an enjoyable dinner with my great mate Eirene and a couple of wines, I decided to get the pattern review over with. Photos were taken on my iPhone. This dress is too pretty not to share with my internet sewing mates :D


Pattern Review: McCall's 5850
"Create It" pattern - I made the strapless bodice, flat midriff band and gathered skirt. Fully lined.

Size: I cut a size 6, graded to an 8 waist, however I could have cut a straight 4.

Fabric: 1.7m linen blend from Lincraft, 1.8m sunsilky polyester lining. I actually needed 1.8m dress fabric but I used the linen from my stash and managed to fit all the pieces on 1.7m.

Notions: 14" invisible zipper, 2m grosgrain ribbon, interfacing, thread.


Techniques:  First time I used boning in the bodice. I had previously only boned a cummerbund. Gee, that sounds dirty...hehehe.


Hours: About 8 dressmaking classes... 16 hours or so. 


Will you make it again? No. No. No. I thought this would be a pattern that I would love and make over and over, but the bodice is so unflattering on me. I could not even bring myself to photograph myself wearing it. There are photos of me wearing another version of this dress here but this is not a pattern I will ever make again. I am really disappointed because I absolutely love this fabric. The bodice is so short up top, I feel over exposed... just doesn't suit my body shape. Possibly also due to the waist seam not hitting my natural waist so I feel naked up top and pregnant below. I just don't feel right in this dress.


Total cost:  $50ish - dress fabric $25, lining $18, zipper $5, grosgrain ribbon $5


Modifications/Adjustments: 

  • For the lining, I cut the slimmer skirt (I think it was the bubble skirt pattern piece) so that it would eliminate the puffiness around the belly
  • Added the grosgrain ribbon 'straps' to see if it would help hold up the dress because the bodice wasn't hugging my bust and the waist wasn't on my waist so it wasn't holding the bodice up. The waist seam sits pretty much in the middle of my rib cage so no matter how snug it is at the waist seam, the dress won't stay up
  • Grosgrain ribbon for the waist seam, but I haven't sewn it on yet
  • A very narrow seam allowance when I joined the shell and lining together at the top - I hoped that this would add a little height to the bodice... it added about 0.5cm which did not make much difference. The narrow seam allowance also caused the lining to ride up even though I understitched. Thinking I might have to top stitch or stitch shell and lining all together when I sew on the grosgrain ribbon at the waist seam
Final thoughts: I have seen other versions of this dress (like this one-shoulder version by Inez) and they look awesome. 
It's an easy strapless dress pattern, unfortunately it does not suit my body shape - I feel like I am wearing a sack... the bodice flattens my almost-non-existent bust, then poofs out at my rib cage making me look like a tent with no boobs.
I'm happy with the craftsmanship because I know the effort I put into this dress was 100%. 
I really enjoyed putting the dress together, great learning experience and has made me aware of what does and doesn't suit my body shape.
My teacher and I knew we were taking a risk making a strapless style because I don't have the bust to hold it up but it was a risk I was willing to take so I could learn how a strapless dress is constructed.
After experimenting with other bodices, the most flattering bodice for me has to nip in at/just above my natural waist. Babydoll-like styles are not for me.

TIP: Don't be intimidated by the many small pattern pieces because it's quite easy to put together once all the cutting and interfacing is complete.


Read More
Powered by Blogger.

© 2011-2014 Sew Me Love, AllRightsReserved.

Designed by ScreenWritersArena