Showing posts with label M5845. Show all posts

Sunday, 10 November 2013

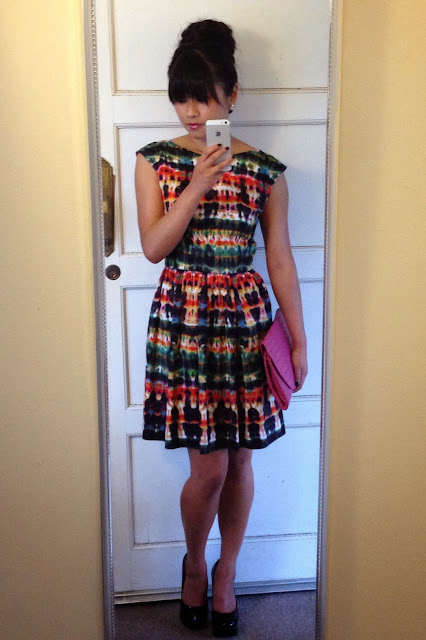
Finished Project: A psychedelic dress.


I don't know if I can/should even tag this post with the label "McCalls 5845" any more since the only original part is the front bodice, and even that has a slight alteration... so I apologise to the people who stumbled on to my blog when googling "M5845". 

You've heard it before, the 5845 is my favourite sewing pattern of all time.
The 5845, a simple darted bodice with a high front neck, low cut back and fitted skirt. 
The version I have made has a low scoop back and full gathered skirt.

I found this cotton sateen in my stash, washed it, dried it, then stared at it for days. Days. Not even exaggerating. I couldn't decide between making another strapless M6349 (with short full skirt) or a M5845 with short full skirt. In the end, I stuck with my TNT pattern - M5845.

The bodice is the same as my floral version with outside darts except I did a swayback adjustment, a proper one. The skirt is from M6349 so it's slimmer than my "self drafted" full gathered skirts. I prefer this skirt, it's less poofy and less hem to handsew.

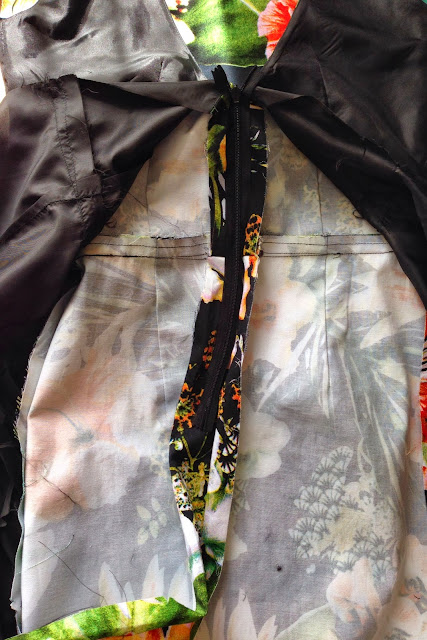
I lined the bodice with red sunsilky polyester, installed a waist stay, and handpicked the zip.


Here is the low down...

Pattern: McCall's 5845 bodice with alterations, McCalls's 6349 skirt
Size: 4 bust, 10 waist, 6 skirt.
Fabric: 1.5m cotton sateen (Darn Cheap, I think! I don't even remember buying this fabric), 0.5m sunsilky lining
Notions: Gutermann thread, dress zipper 14" (black), 80cm grosgrain ribbon, bikini hook,
Cost: Fabric $20, Lining $5, Zipper $2, Grosgrain Ribbon $2, Bikini hook $1
Hours: about 8hrs
Pattern Modification/Adjustments:
  • Lowered front neck
  • Scoop back
  • 1cm sway back adjustment
  • Replaced fitted skirt with full gathered skirt
Techniques Used:
  • Waist Stay (great tutorial by Sewaholic here)
  • Hand picked zip
  • Gathering (skirt)
  • French seam (skirt side seams)


I did my best to match up the squiggles at the seams. Looks pretty rad!
I added a grosgrain ribbon waist stay to take some pressure off the zip and to cover up the waist seam. Love waist stays, they look so pretty.
The best part of this dress is the hem. I deliberately hemmed the skirt so that the solid black would sit on the edge of the hem.The hem is quite thick - 8.5cm to be exact!! I wanted to leave the hem thick, kinda like a faux-hem-facing. Can't get enough of the psychedelic print.
I french seamed the skirt side seams for a neat finish.


The print is so crazy, my sister nicknamed it 'psychedelic' so I stuck with the name. It is kind of mesmerizing to look at. Maybe that's why I was staring at it for days. Maybe I was in a trance?

Cos it's such a crazy, colorful print I found it super hard to style cos I suck at ANYTHING to do with accessorizing. I will never be on of those girls that can pair up a printed dress with bold accessories and crazy shoes. I tend to stick to plain jewellery (sometimes no jewellery) and plain shoes. Boring, plain Jane. Boo.

I tried the dress on with a pink envelope clutch to bring out the pink in the dress, and plain black patent leather heels and tweeted for help! The #sewcialist ladies gave me the thumbs up on my outfit so I wore it to my builders awards night on Friday.


It was a cool evening so I ended up wearing a black ASOS blazer over the top of the dress. Borrowed the hot pink clutch my my sister. The event was wonderful as usual, great food, awesome drinks and it was great to see builders win awards for houses that they put their heart and soul into building.

Initially I was hesitant to wear this dress out. I even had a back-up outfit planned!
I'm so used to wearing plain colors or florals so this crazy print was a challenge.

I am more critical of myself when I wear a handmade/me-made dress, everything has to be perfect, because I can't really blame "the dress" if I look like a fail... cos I made it myself!

Does anyone else feel this way?


Read More

Tuesday, 15 October 2013

Finished Project & Pattern Review: Outside Darts, McCall's 5845.

    So pleased with where the flowers ended up on the bodice.

Um, so I did not know that I have this awesome blank wall in my sewing room! 
So great for photographing my dresses. 

The sewing room has been great to work in, flooded with natural sunlight during the afternoon and warm enough for me to walk around with half my clothes off when I'm stabbing my body with pins at fitting stage. It is fricken hard when you live alone. 

Any tips for a sewist with no house mates? How do you guys get pinned up?
I gotta look at training the boyfriend up on seam allowances and pinning.

As you know, I had some time off work last week so I had plenty of time and no excuse not to sew something. My deadline was Friday 11th as I needed something to wear to my friends' wedding the next afternoon. 

I wanted to challenge myself so I moved away from my usual full skirts and so the measuring of butts began!

Scribbled my body measurements on the back of a takeaway pizza receipt.

I believe what I've written on the above paper are my body measurements in cm and inches, the sizes I chose and the finished measurements on the pattern piece for the size.

The pattern is my favorite pattern of all time - the McCall's 5845. I've made this dress heaps of times, mostly with full skirts, always with back modifications, but NEVER with the darts on the outside as per pattern instructions!

When you search '5845' in PatternReview.com the results page is flooded with reviews from me and Cindy of Cation Designs. We both love this pattern to bits and have modified the heck out of it. Pattern hacking, yay.

Main reason I was never a fan of darts-on-the-outside was because my stitching is sometimes wonky, and my backstitching looks horrible (I blame my machine). 

Well, here are my darts-on-the-outside, what do you think?

Outside darts ftw!

No bad huh?? I love the look of them, they give the dress texture and enough character that a belt is not needed. 

The modification that I always do to the M5845 is the front and back neck. I lower the front neck line about 5cms, and the back neck I usually raise a few inches - just enough so my bra strap is not exposed. 

This time I left the back low and made it into a scoop instead. Bra, schma!

The only modification I made to the pattern - scooped back.

I cut a size 4 bodice, graded it to a 10 waist.

I usually cut an 8 waist, which just "fits" but occassionally rides up, which probably means it's not a great fit! 

I swallowed my pride and cut a 10 on this version to make room for the champagne and wedding cake.

The skirt piece started as a 10 at the waist, graded to an 8 around the butt. 

I ended up taking the side seams of the skirt in around the hips, so I probably could have graded to 8 at the hips. I don't know. I'm still new to this wiggle skirt business. 

I winged most of the adjustments to the skirt. I did something which I think was a 2cm sway back adjustment, you can probably see the stitching in the photo below. Dunno if it was the right adjustment to make, but it certainly took away some bagginess around my lower back. 

My swayback faux-justment messed up my skirts back centre seam. Things went slightly off-grain when I inserted the zip. This resulted with a slight crinkle at the back of the skirt. It pissed me off at first but then it started to look like "butt-gathering" and didn't look too bad so I got over it.

I will never enjoy working with sunsilky, that shit frays like cray but once it's on the dress everything is beautiful again. I love fully lined dresses!

I hate looking at the inside fraying edges and stitching everywhere!
Thank goodness for lining.
I love the floral print so much!
Invisible zipper.
Machine-finished-zipper-sandwiched-between-shell-and-lining (tutorial here).
Fully lined with black sunsilky lining.
Hand stitched the hem (4cm hem) and machine stitched the hem on the lining.

Hand stitched hem looks way better than the disastrous machine hem on my Butterick 6582.
I turned the hem up 4cm on the shell and 8cm on the lining (4cm then up 4cm again to seal in the fraying edges).
Very proud of my straight machine stitching :)
Look at the lining!

Pattern Review: McCalls 5845 (view B, no belt), outside darts.

Size: 4 bust, 10 waist, 8 butt 
Fabric1.5m cotton sateen (Darn Cheap), 0.7m sunsilky lining (Spotlight). I had purchased 1.5m of fabric however the wiggle skirt does not need much fabric. I reckon I only used about 1m of fabric. Plenty leftover for a self-fabric belt!
Notions: Gutermann thread (000), Invisible zipper 10" (black) - I should have used a longer zipper but I had this in my stash.
Time: 3-4 hrs each day, over 5 days
Cost: Fabric $20, Lining from stash (but generally it's $10/m), Zipper from stash
Pattern Modification/Adjustments:
  • Scooped back
  • Lowered front neckline by 5cm
  • Sway back adjustment
  • Size 4 bust graded to 10 waist graded 10 hips, graded to 8 at the butt however ended up taking in the skirt at the hips anyway, so probably could have gotten away with 8 at the hips too, despite my hip measurements being for a 10. Massive sigh.
Techniques Used:
  • Darts (on the outside this time as per pattern)
  • Machine-finished-zipper-sandwiched-between-shell-and-lining. No idea what the technique is called (clearly) but my attempt at tutorial here.
The skirt fits like a dream!!
These was a little wrinkle but I know it's cos I rushed the zip and it's a little off grain.
The scooped back and shoulders fit well, no gaping, yay!
It took me 4 attempts to get the zipper in straight and with waist seam matching perfectly.

What I like about the pattern is how simple it is to prep and sew. An experienced sewist could easily finish this in a day. 
There's 4 pieces to cut out - front bodice, back bodice, front skirt, back skirt. 
There's a total of 8 darts on the bodice and 6 on the skirt. Of course if you fully line the dress, it's x's 2 all the above.

The only difficulty I experienced while making this dress (apart from fitting) was the zipper. 
Oh my god, I almost threw in the towel. The whole zipper session I kept hearing this lyric in my head, not sure from which song, "hoping for the best, but expecting the worst" cos every time I finished sewing down the zipper, I'd zip it up hoping all is good.. and then the fkn seams wouldn't match. 
Finally after 4 attempts, everything matched up, no teeth were ruined (zipper teeth) and the dress fit. 

Saturday, wedding day! It was a gorgeous day, a little windy but super sunny. 
I woke up early to get my hair done. Got home, ate lunch, put on some Arbonne taffeta blush, dress on, quick pics for the blog then headed out to the beachy suburb of Brighton for the ceremony. 

The ceremony was lovely. The reception was even lovelier! It was at a restaurant over looking the bay. There was even a sunken submarine! Bride and groom had wedding pics on the jetty while the guests got into the champagne.

Food was yum! Ate the thickest rib eye ever!! 
Speeches from the Dads, Best Man, MoH, Groom - hilarious!! I was crying from laughter!

I only took a few pics as my iPhone would not do the bride and groom justice... I love the photo I got of the couple cutting the cake, look at how happy the groom is while looking at his wife! Adorable!! 


I'm so glad the bride encouraged me to make a dress to wear to her wedding, cos now that I've seen how great this dress turned out, I can't wait to make more. I hope you guys liked my outside darts and wiggle skirt as much as I did.

I don't think I've seen a version of this pattern with outside darts on the internet yet. If you have, please link me to it in the comments below! 

I have a work function this Friday but I don't have time to make anything. Sadface. 
See the dresses I made for last year's awards nights here and here.

I still have plenty of occasions this year to sew for: Halloween,, another work awards night, work Xmas party... so help me out with ideas guys! 


Read More

Monday, 26 November 2012

Finished Project: A bodice NOT cut on 'centre fold'.

#selfie :P
I have always cut my 'front bodice' pieces on the 'centre fold' as instructed by the pattern, and so far have not had any issues with prints landing on awkward places. Example...

Source: 
Carrie Bickmore got flack for wearing this dress on the  last night. 
Do you see something rude? 
.... I'm thinking the designer intended it that way cos I doubt they would miss *that*! I also see a crab and an alien.

Gorgeous dress.

When I started cutting out the bodice for my 'Christmas Party' dress, I had my front bodice on the centre fold but could not find a flower arrangement I was happy with. The flowers on this fabric vary from small to large and are scattered about. 

I didn't want to end up with a front bodice with mostly 'white' and little flowers, or flowers smack bang on my lady lumps so I did something different - I didn't cut on the centre fold!

The collage below shows:

  • Pic 1 - My fabric
  • Pic 2 - Option 1 if cut on centre fold - not enough big roses, bit meh
  • Pic 3 - Option 2 if cut on centre fold - three big roses... but something still not right
  • Pic 4 - Bodice if cut away from centre fold. Me likey.

To do this, I had to trace out another pattern piece as if it were the actual front bodice, use the 'centre' of the bodice as the grainline, un-fold the fabric and measure-measure-measure my grainline.

It is trickier than cutting on the fold, but I am far happier with how the flowers are arranged on the front bodice now. I deliberately placed the large rose up on the chest/shoulder so it looks like a corsage.

I didn't have enough fabric to play around with the pattern placement for the back bodice because the remainder was for my gathered skirt so I had to make do with the fabric left over from the front bodice.

Doesn't look too bad though.


The pattern I used for this dress is old faithful M5845 (oop). I've made this bodice many times with a circle skirt, wiggle skirt and it's original skirt for myself, but never a full gathered skirt.

I did make a version with a full gathered skirt once, but that dress was for my sister and I always envied her version, so I decided to make myself one too!


Isn't my sister gorgeous! Dress blogged here. 

I used the same size pattern pieces, except I made an adjustment to the shoulder line. I took off 1cm.

I followed this tutorial by Anna (::Paunnet::).

The M5845 bodice is dart central. A total of 16 darts on shell and lining. I used this tutorial  by Rochelle (Lucky Lucille) to trace my darts the easy way.

It was a bit hard to do this technique on the lining because the chalk didn't stay on the polyester, but on cotton, it's perfect. My darts have never been so straight!


The fabric I used for the shell of the dress is a cotton sateen I bought from Spotlight. You know by now how much I love florals, so I just had to have this.

The lining is red sunsilky polyester.

I decided to line the bodice only. I think I'm going to skip the skirt lining from now on unless it's a fitted skirt.


Inside the bodice lining...
I handpicked the zipper, french seamed the side skirt seams...
...lined the bodice, added a white grosgrain ribbon waist-stay,
 hand sewed the hem (yes!! I hand sewed 2 meters of hem, took 1 hour).

Summary: Floral 'corsage' dress.

Pattern: M5845 bodice, self drafted full gathered skirt
Size: Size 6 bust, 8 waist
Fabric: 1.5m cotton sateen (Spotlight), 70cm sunsilky lining (red)
Notions: Dress zipper 16" (hot red), Gutermann thread (800, 156), 1m grosgrain ribbon (white), bikini hook (1)
Time: 8-10 hours over 3 days, didn't really keep track, only remember that the bodice was finished in record time of 3.5 hours
Cost: Fabric $25; Lining $10, Zipper $2; Grosgrain ribbon $2; Bikini Hook 50c
Techniques used: 
    • French seam
    • Darts
    • Lined bodice
    • Gathering
    • Handpicked zip
    • Blind catch stitch on the hem 
Pattern Modification/Adjustments:
    • Shoulder line adjustment
    • Side seam allowance 2cm
    • Raised back by 5cm
    • Lowered front neckline by 2cm

I'm so happy with how the bodice turned out, my favorite feature of the dress is the huge 'corsage'.

I read somewhere that the only reason the pattern companies design the pattern piece to be cut on the centre fold is so they can save paper (and money). 

If I ever work with fabric that has scattered prints everywhere, I will use this technique to cut out the pattern pieces so I can control where the prints end up. 

What about you guys, do you ever not cut on the fold? 


Read More

Monday, 27 February 2012

Finished Project: 'Sister High Tea Dresses'.

As promised, here is my post to detail the construction of the skirts for the dresses and photos of the inside.

Both dresses were made using the bodice of the McCalls 5845 pattern, with minor adjustments to the front and back. I made the skirts by following tutorials from Gertie's New Better Blog for Better Sewing and Curves, Patterns, and Pins. Thank you ladies for posting such detailed tutorials :D


Dress 1: Big Sister's Dress w/ Full Circle Skirt.

M5845 bodice BACK, 2 front box pleats on skirt, bias binding to finish hem.
INSIDE: zig zig stitch on hem, lace trim. Bias binding on the hem of dress fabric.
2cm back seam allowance.
Big sister's dress, review.

Pattern: McCall's 5845 bodice, full circle skirt cut using Curves, Patterns, and Pins tutorial
Size: Size 6 bodice, graded to size 8 waist.
Skirt info: 
    • Skirt lining cut 3cm shorter
    • Length 45cm (46.5cm with SA, no hem)
    • I followed the formula, but kept ending up with extra fabric, I got rid of it by adding box pleats. Reana from Curves, Patterns, and Pins gave me a link for a circle skirt calculator which I will use next time to check my calculations. Reana didn't have any issues with her skirt, so it is probably my math that is the issue!! :)
Fabric: 1.7m cotton sateen, 1.7m acetate lining (used the "cheap" lining because I didn't want to spend $20 on sunsilky), 5m lace.
Notions: Invisible zipper (black) 16", Gutermann thread (000)
Modifications: 
    • Lowered neck by 5cm
    • Raised back by 5cm
    • Skirt cut using Curves, Patterns, and Pins tutorial
    • 2cm back seam allowance
    • Invisible zipper instead of dress zipper
    • Used bias binding on the hem - it is so hard to hem a circle skirt! Thank you heaps to the girl at Clegs who suggested that to me.
    • Darts on the inside not outside
Time: a few hours over 3 days to finish the dress... But then I unpicked the hem on the lining and the dress and started over. Took another 2 hours. Total hours: 9 or so.
Total cost: $25 (fabric, lining, lace and zip), pattern and thread from my stash.

Big sister's dress: I love the effect of bias binding on the hem - that solid black finish looks great to me.
Modifications to the back allows me to wear a bra.
Modification to the front - it's sits just below my collar bone which is very comfortable. .


Dress 2: Little Sister's Dress w/ Full Gathered Skirt.

M5845 bodice. Gathered skirt, skirt hem circumference 2.4m.
INSIDE: "Pistachio" acetate lining. Excuse my dodgy ironing skills, I'm still learning!
Zig zig stitch finish on hem, lace trim.
Little sister's dress, review.

Pattern: McCall's 5845 bodice, full gathered skirt cut using Gertie's New Blog for Better Sewing tutorial
Size: Size 8
Skirt info: 
    • Length 50cm (54.5cm with 3cm hem and 1.5cm SA)
    • Skirt width 2.4m
    • I cut the 2 pieces on the centre fold (60cm wide, from centre to selvege, length 54.5cm). I cut 1 of the pieces in half to make the back of the skirt (needs a back seam)
    • Skirt lining cut 3cm shorter
Fabric: 1.7m cotton sateen, 1.7m acetate lining (used the "cheap" lining because I didn't want to spend $20 on sunsilky).
Notions: Invisible zipper (peacock) 16", 3m lace, Gutermann thread (189, 282) 
Modifications: 
    • Lowered neck by 5cm
    • Raised back by 6cm (my sister's dress needed 1 more cm).
    • Full gathered skirt cut using Gertie's New Blog for Better Sewing tutorial
    • Invisible zipper instead of dress zipper
    • Darts on the inside not outside
    • No mod to back SA
Time: a few hours over a 4 days to finish the dress.
Total cost: $15 (lining, zip, thread), pattern from my stash. The fabric was given to me from my sewing friend Katherine- thanks Kat! We are planning to go to the ballet later in the year. Look out for the dresses we will be making for that outing!


Little sister's dress: I love the colour of this fabric and the lining looks yummy.
The full gathered skirt and modest length is very flattering on my sister. She looks very lady-like.
My sister loves the everything about the dress. 
Today was my first day at my new office. The building is gorgeous! Now that I am no longer next Clegs and Lincraft, I'm not sure if I will be sewing at home as often as I was. I guess I can use this time to move on to a new pattern. I have sewn the McCall's 5845 bodice six times now. I think it's time to get out of my comfort zone.

The kitchen is gorgeous!
I don't know any other words to use to describe this kitchen, it's not often that I compliment kitchens.
The photo in the bottom right corner is our "live wall"... the plants on the wall are alive!
Looking at my pattern collection, I am interested in making the V2960, the bodice is nice, and the V8511 has a nice silhouette. Whether or not it will look good on me is a different story! I don't have a stick body like the drawing, lol. I'd love to make dresses using the vintage patterns from Etsy, but my sewing teacher says I got the wrong size, and it might be hard to make adjustments. Zz. Well, in the meantime, I'll leave you with more photos from Saturday... now that I no longer have Facebook, all my favorite photos will get shared here :P Just kidding, I'm only sharing these pics because it features the handmade dresses in action! I like to see my dresses being worn, it makes me happy and motivated. Don't worry, I won't bore you with boring Instagrams of random letterboxes and tree branches - not that I take photos of those objects.

Jumping around at Parliament House, pouring a glorious blooming tea,
deciding which finger sandwich to get into first, showing off our full skirts.
Silly poses, selfies in the powder room,
Drying off by the Yarra after a 40 minute City Circle tram ride, more silly poses.
Check out the matching belts, nail polish, doctors bags and Infinity Tiffany & Co ring and bracelet!
Happy 18th Birthday little one. 


Read More
Powered by Blogger.

© 2011-2014 Sew Me Love, AllRightsReserved.

Designed by ScreenWritersArena